Welcome to Crazed Creations by Crystal Tutorials!
I have been hunting down all of my tutorials for a few years now,
and finally I was able to locate them just the other day.
Some things to know about these tutorials... 
Most of them are missing links to supplies, whether it is 
because an artist or designer has retired, tagger's blog has 
been deleted etc. In this case, please treat the tutorial
as inspiration. As I update each tutorial, I will slowly re-release them.
ALL Tutorials before 2024 are AI FREE, meaning no AI was used.
and all newer tutorials will be labelled accordingly.

Any and all Tutorials posted within this site
are of my own creation.
Any similarities to any other is purely coincidental.
 DO NOT CLAIM AS YOUR OWN!
You are allowed to use them as challenges within your forum 
by linking back to this site.
I hope you enjoy the tutorials that I have created.
Please feel free to leave comments and or suggestions!!!
Some tips...
I use abbreviations in my tutorials, 
the more common ones are below:
C&P~Copy and Paste
RS~Re-size
DS~Drop Shadow
MW~Magic Wand
Showing posts with label Template: CCBC. Show all posts

Urban Attitude


This tutorial was written by Chasunicorn

on July 8,2012

*Updated on January 27, 2026*

Supplies:

Tube: Zlata_M

Urban Addiction by Abstract Creations

Template: Made by myself HERE

Mask of Choice

Filters:

Eye Candy 5~Gradient Glow

Tramages~Pool Shadow & Mo'Jellyfish

Drop Shadow:

Your choice

Template:

*Raster 1...MW...C&P paper 5...Apply Mask of choice

Merge Group

*Raster 2...MW...C&P paper 1 as a new layer...Invert/Delete

Merge Down

*Copy of Raster 2...MW...C&P paper 7 as a new layer...Invert/Delete

Merge Down

*Raster 3...MW...C&P paper 4 into selection

*Raster 4...MW...C&P paper 6 into selection

*Raster 5...MW...C&P paper 7 into selection

*Raster 6...MW...C&P paper 9 as a new layer...Invert/Delete

*Raster 7...MW...C&P paper 5 into selection

Add some Gradient Glow to the template layers (optional)

C&P Elements:

*Element 43...place behind Raster 5...Add Pool Shadow Default Settings

Duplicate and Mirror

*Element 29...Place behind Buildings

*Element 16...RS 65% and again at 75%...move to the right of the tag

*Element 23...RS 75%x2 Mirror and slide to the right side and place behind Ipod

Duplicate and RS 75%...Mirror and Place on top of the other box

Add your preferred Tube where you think it looks best

Duplicate tube add a slight blur and add

Tramages~ Mo' Jellyfish default settings

*Element 38...RS 85% place in front of your tube

*Element 4...Use Selection tool and trace around one of the speakers...RS 85%

behind buildings...Repeat for the other speaker and place it a bit higher behind the

buildings

*Element 60...Place as top layer...Opacity 66%

*Element 32...Free Rotate 90 to the right...

Place between raster 2 and Copy of Raster 2

Duplicate flip and mirror...place in front of the boxes.

Add your name, Copyright info and Watermark

Re-Size your tag if you want to and you are done


Happy Halloween


This tutorial was written by Chasunicorn
On September 15, 2012.
*Updated November 2025*
Supplies:
Tube by PinUp Toons
Not seen since SDNC
Kit by Abstract Creations
This Designer has Retired
Template by Me HERE
Mask Of Choice
Filters:
Eye Candy: Gradient Glow
Drop Shadow:
Whatever you prefer
Template:
**Delete Credit layer
*Raster 1...MW C&P paper 2 into selection and apply mask...
Merge group.
*Black Rectangle...MW...C&P paper 1 into selection
*White Rectangle...MW...C&P paper 3 as a new layer Invert/Delete
Merge down
*Merge Right and Left Grey Rectangle layers...MW both rectangles and
C&P paper 4 as a new layer...RS by 85%... Invert/Delete...Merge down
**Add some Grad Glow to all layers
C&P Elements:
*Element 11...C&P above Black Rectangle...move to the left slightly
*Element 9...C&P as the top layer...move slightly to the top of the
canvas...align with the top left corner of the Black Rectangle.
*Element 14...RS 55% x2...Image/Free Rotate 30% to the left...place on the web.
*Element 8...RS 75%...Erase the handle...slide to the bottom right corner of the canvas
*Element 4...RS 55% x2...Place in from of the caldron
*Element 5...RS 55% x3...Mirror and then Place by the pumpkin
*Element 12...RS 75% x2...Image/Free Rotate 30% to the right
place in the top right corner of the canvas
**Chose your White Rectangle layer...Select all/Float/De float...
Select/Modify/Contract by 2...Add your tube...Erase any part of the tube that
goes pass the white Rectangle
Duplicate your tube...slide one copy under the left and right rectangles
On the top copy erase any part of the tube that hangs over the top rectangles on the right.
If your web goes through your tube layers just delete some of the web that peeks through.
*Element 15...C&P and RS 75% place it where you like
Add your name, Copyright info and Watermark
Re-Size your tag if you want to and you are done

B.A.S. Member


Tutorial Written on November 7, 2024

Remember use this is a Guide and have fun with it


Program Used~ PSP2023 but any should work

Scrap Kit~ Blaque Heart Designs~ Grim Gothic HERE

Mask ~ Your Choice of Mask

Tube~ Your Choice of Tube 

I am using a Bag A Snag Exclusive AI Tube

by Blossom

Template~ My Template HERE

Drop Shadow~ Your choice on Drop shadow

Elements Used: 

237 

252 (only the bottom portion)

 246 (only the top portion)

 222 x2

 224

279

277

Papers:

19

18

13

12

9

3


Tip: Add DS as you go along

And Re-size elements to your liking!


BKG Layer~ Select All… C&P into Selection Paper 18… Deselect… Add your Mask of Choice


Top Left Circle~ Select All.. Float.. Defloat.. C&P Paper 12 as a new layer… 

Adjust paper so the Moon is Visible… Invert Selection…Delete…Merge Down to Circle… Deselect


Top Left Square~  Select All.. Float.. De-float.. C&P Paper 9 as a new layer…

Adjust paper so the Branches are Visible… Invert Selection…Delete…

Merge Down to Square… Deselect 


Top Left Square 2~ Select All.. Float.. De-float.. C&P Paper 19 into selection… Deselect


Middle Right Circle~ Select All.. Float.. De-float.. C&P Paper 13 as a new layer…

 Adjust paper so the so that you have equal amounts of Red & Black (See Tutorial Header Tag)… 

Invert Selection…Delete…Merge Down to Circle… Deselect


Middle Right Square~ Select All… Float… De-float…Flood Fill with  #ba0202

Effects… Texture…Blinds (W: 20 O: 20 Color Black No Checks)


Bottom Left Circle~ Do the same as Step 5


Bottom Left Square~ Do the same as Step 4


Bottom Left Square 2~ Do The Same as Step 6


Left Rectangle~ Select All… Float… De-float…Flood Fill Black

Effects… Texture… Tiles…(Square, 75, 15, 3) 

(25, 3, 0, 50)

 (#ba0202, 315, 50, 30)

Move This layer under Bottom Square Layer


Right Rectangle~ Select All… Float… De-float…Flood Fill Black

Effects… Texture… Weave (3, 3, 50 W:Black G: #ba0202 Check in the Fill Gap) 

Move This layer under Middle Right Circle Layer


Center Circle~ Select All.. Float.. De-float.. C&P Paper 3 into selection… Deselect


Tube~ C&P your tube of choice… Adjust your tube to your liking


Now is the time to use the elements that 

I mentioned at the start of this Tutorial

Place these into the tag as you like or use my header tag as a guide

All I say is have fun and make it your own!

Happy Tagging!

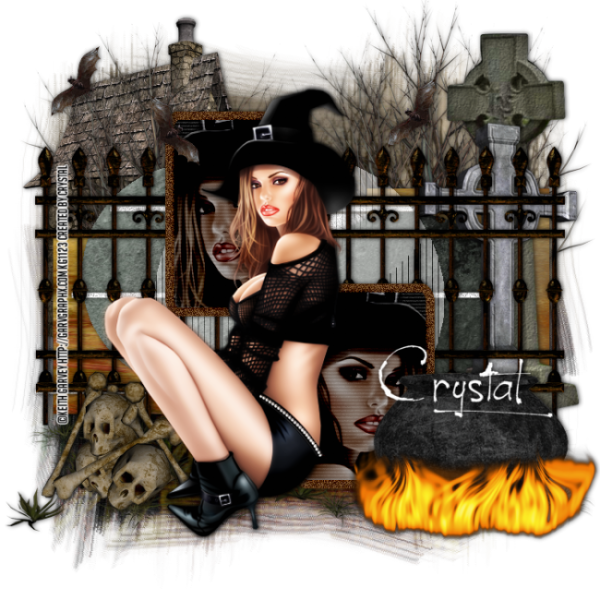
Perfect Scare


 This tutorial was written by Chasunicorn

On September 19, 2012.

*Updated November 2025*

Supplies:

Tube by Keith Garvey

but I have not seen him selling anywhere recently

Scrap Kit by HorsePlay's Pasture Designs HERE

Template by Crazed Creations by Crystal HERE

Mask of Choice

Filters:

DSB Flux-Bright Noise

Photo Effect- Scanlines

Tramages- Tow the Line

Drop Shadow:

Whatever you prefer

Template:

*Open Template and Duplicate Close the Original.

*Raster 1...MW...C&P paper 2 into selection and

apply a Mack of your choice.

*Raster 2...Apply DSB Flux/ Bright noise Default Settings

*Raster 3 & Copy Of Raster 3...Merge Down Layers

MW...C&P paper 9 into selection

*Raster 4 &Copy of Vector...MW...C&P paper 7 into selection

*Raster 5...Add DSB Bright Noise...Any Settings is fine.

*Raster 6 & Copy of Raster 6...Merge Down...Select/Float/Defloat

Apply a color from the tube or kit and add Bright Noise.

*Raster 7 & Copy of Raster 7...Merge Down...MW...

add your close up to the Rectangles...Merge Close Up layers

Duplicate...On original Close up Blend mode Luminance (L)

On the cope apply a Gaussian Blur 2% and Blend mode Burn.

Opacity on all Close Up layers set to 65%

On the Black Rectangle Apply Photo Effect- Scanlines

settings 2/2/20/36/65/0

*Raster 8...Apply Tramages- Tow the Line settings 80/54/48/9

Opacity 50%...slide under Raster 6

Add your preferred Tube where you think it looks best

C&P Elements:

*Element 13...Place on top Raster 2...Duplicate and mirror

*Element 34...Place on top of Raster 8...Duplicate and Mirror

*Element 42...Place above the mask...Slide towards the bottom

of the canvas.

*Element 14 and 15...RS 85% on both 2 times and arrange to your liking

(See my Tag for reference)

*Element 33...RS 65%...Place behind the trees to the left of the tag

*Element 8...RS 65%...Place to the Right of the canvas

(See my Tag for reference)

*Element 7...RS 65%...Place to the left of the Canvas

(See my Tag for reference)

*Element 29...RS 65% 2 times...Duplicate a few times

place randomly around your tag

Add your name, Copyright info and Watermark

Re-Size your tag if you want to and you are done