Welcome to Crazed Creations by Crystal Tutorials!
I have been hunting down all of my tutorials for a few years now,
and finally I was able to locate them just the other day.
Some things to know about these tutorials... 
Most of them are missing links to supplies, whether it is 
because an artist or designer has retired, tagger's blog has 
been deleted etc. In this case, please treat the tutorial
as inspiration. As I update each tutorial, I will slowly re-release them.
ALL Tutorials before 2024 are AI FREE, meaning no AI was used.
and all newer tutorials will be labelled accordingly.

Any and all Tutorials posted within this site
are of my own creation.
Any similarities to any other is purely coincidental.
 DO NOT CLAIM AS YOUR OWN!
You are allowed to use them as challenges within your forum 
by linking back to this site.
I hope you enjoy the tutorials that I have created.
Please feel free to leave comments and or suggestions!!!
Some tips...
I use abbreviations in my tutorials, 
the more common ones are below:
C&P~Copy and Paste
RS~Re-size
DS~Drop Shadow
MW~Magic Wand
Showing posts with label AI Used. Show all posts

Caramel Dreams


This tutorial was written on January 22, 2026
I use PSP2023 but any version should work.

Supplies:
Scrap Kit by Simplistic Creationz 
Mask of Choice
Add your DS as you go to your liking

Step by Step:
*Open a 600x600 canvas
*Select All and C&P paper 8 into selection
*Apply mask of Choice and merge group
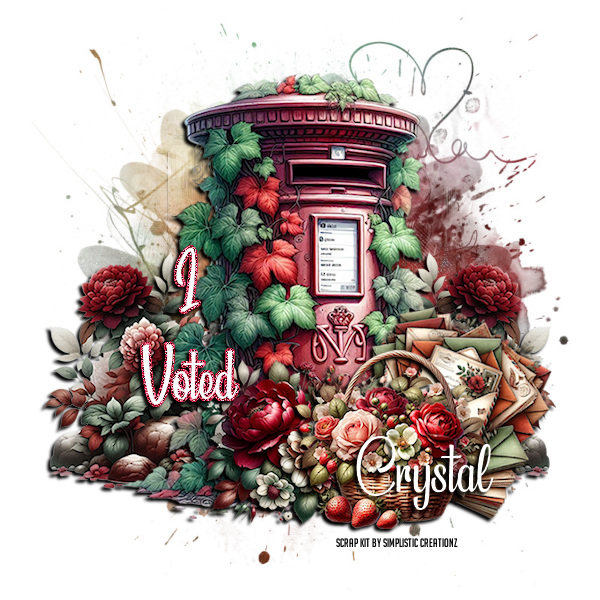
*Element 101, C&P element as a new layer, RS to your liking, Place to the left of the canvas, Duplicate and Mirror Horizontally
*Element 24, C&P element as a new layer, RS to your liking, Place in the center of the canvas
*Element 105, C&P element as a new layer, RS to your liking, Place to the right of the Mailbox, Image/Free Rotate to the right/ 22.5
*Element 52, C&P element as a new layer, RS to your liking, Place to the right of the Mailbox in front of the letters
*Element 75, C&P element as a new layer, RS to your liking, Place to the left behind the basket, Flip Horizontal so the large red peony is seen
*Add some wording… this is going to be a "I Voted" tag for me.
*Add Credits and your name and you have created a quick easy tag
Happy Tagging all!


Copper & Cashmere


 This tutorial was written on November 28, 2025.

Supplies:
Copper & Cashmere Scrap Kit by IPD HERE
Tube by Nocturne  (Any sitting tube will work)
FB Timeline Template by Millie HERE
Fall word art or quote 

Step by Step:
1. Open the Template… Duplicate and close the original.
Delete the credit layer
2. Raster 1… Selections - Float De-float…Open Paper 30 and C&P as a new layer, adjust the paper to show what you want to see…. Then Image - Crop to Selection. Merge new layer down to the Raster 1.
3. Raster 2 & its duplicate layers & Raster 3(All the blue shapes)…Selections - Float - De-float…Open paper 3 and C&P paper into selection… Repeat the same process for each blue shape layer… Raster 3 is just slightly different instead of C&P in selection, C&P as a new layer and find a swatch for the long blue rectangle… Selection - Invert - Delete
4. All of the purple shapes and Raster 4 and repeat the same steps using Paper 1
5. Raster 5… Selection - Float - De-float then flood fill with complementary color I am using #dea838
6. Tube layer…C&P where ever you want it…RS if needed… I placed my tube right about center
7. Element 172… I resized this bundle of leaves and flowers a few times and duplicated it 3xs,  then arranged them along the bottom of the canvas
8. Element 161… I resized this stack of books and placed them to the right of my tube
9. Element 146… I resized this basket of yarn and duplicate then placed to the left of your tube
10. Element 169… I resized this shelf and placed it to the right of the tube, sliding into the corner
11. Word Art… Add your word art where you feel it works best
Add your ©  and name and save


Trip to Grandmas


This tutorial was written on November 11, 2025.
Supplies:
Tube of Choice
I am using Cutie by Nocturne
This tube was available through PFD 
Kit by Wicked Princess Scraps HERE 
Word Art of Choice
Drop Shadow:
0 - 0 - 65 - 10
Canvas:
851x315
Step by Step:
*Selections ~ Select All
*Open Paper 1 and C&P into selection
*Open Element 14…C&P as a new layer
RS by 75% then place to the left of the canvas
*Open Element 16…C&P as a new layer
RS by 75% twice and place to the right side of the canvas
*Open Element 17…C&P as a new layer
RS by 50% and then again by 75% then place to the right just behind the building
*Open Element 11…C&P as a new layer
RS by 55% three times and then place at the corner of the building
*Open Element 10…C&P as a new layer
RS by 55% three times then place to the Right of the cart just behind the well
*Open Element 9…C&P as a new layer
RS by 55% and now I am going to slide this element to the bottom of the canvas…
Adjust the layer so it looks like a pile of leaves
*Now if you want to add a tube you can, 
I added a dog tube by Nocturne but you can choose whichever tube you want
*Selections ~ Select All
*Images ~ Crop to Selection
*Click on the top layer of your design...
Layers ~ New Raster Layer ~ Enter... Selections ~Select All
*Open Paper 11... Images ~ Rotate Right...
C&P into Selection... Selections ~ Modify ~ Contract by 5 ~ Delete
 *At this point when nearing what I think is the end of the design
I add my drop shadow...which I have posted above... 
but feel free to use a different shadow configuration
Add your shadow to each layer except the bottom layer
*I have chosen a quote to use by Oprah Winfrey
and have made it into a tag line/word art.
*Add your Copyright info and enjoy you new timeline cover

B.A.S. Member


Tutorial Written on November 7, 2024

Remember use this is a Guide and have fun with it


Program Used~ PSP2023 but any should work

Scrap Kit~ Blaque Heart Designs~ Grim Gothic HERE

Mask ~ Your Choice of Mask

Tube~ Your Choice of Tube 

I am using a Bag A Snag Exclusive AI Tube

by Blossom

Template~ My Template HERE

Drop Shadow~ Your choice on Drop shadow

Elements Used: 

237 

252 (only the bottom portion)

 246 (only the top portion)

 222 x2

 224

279

277

Papers:

19

18

13

12

9

3


Tip: Add DS as you go along

And Re-size elements to your liking!


BKG Layer~ Select All… C&P into Selection Paper 18… Deselect… Add your Mask of Choice


Top Left Circle~ Select All.. Float.. Defloat.. C&P Paper 12 as a new layer… 

Adjust paper so the Moon is Visible… Invert Selection…Delete…Merge Down to Circle… Deselect


Top Left Square~  Select All.. Float.. De-float.. C&P Paper 9 as a new layer…

Adjust paper so the Branches are Visible… Invert Selection…Delete…

Merge Down to Square… Deselect 


Top Left Square 2~ Select All.. Float.. De-float.. C&P Paper 19 into selection… Deselect


Middle Right Circle~ Select All.. Float.. De-float.. C&P Paper 13 as a new layer…

 Adjust paper so the so that you have equal amounts of Red & Black (See Tutorial Header Tag)… 

Invert Selection…Delete…Merge Down to Circle… Deselect


Middle Right Square~ Select All… Float… De-float…Flood Fill with  #ba0202

Effects… Texture…Blinds (W: 20 O: 20 Color Black No Checks)


Bottom Left Circle~ Do the same as Step 5


Bottom Left Square~ Do the same as Step 4


Bottom Left Square 2~ Do The Same as Step 6


Left Rectangle~ Select All… Float… De-float…Flood Fill Black

Effects… Texture… Tiles…(Square, 75, 15, 3) 

(25, 3, 0, 50)

 (#ba0202, 315, 50, 30)

Move This layer under Bottom Square Layer


Right Rectangle~ Select All… Float… De-float…Flood Fill Black

Effects… Texture… Weave (3, 3, 50 W:Black G: #ba0202 Check in the Fill Gap) 

Move This layer under Middle Right Circle Layer


Center Circle~ Select All.. Float.. De-float.. C&P Paper 3 into selection… Deselect


Tube~ C&P your tube of choice… Adjust your tube to your liking


Now is the time to use the elements that 

I mentioned at the start of this Tutorial

Place these into the tag as you like or use my header tag as a guide

All I say is have fun and make it your own!

Happy Tagging!