
This tutorial was written by Chasunicorn
On September 20, 2012.
On September 20, 2012.
*Updated November 2025*
Supplies:
Tube by PinUp Toons
He has not been in a store since SDNC
Scrap Kit by Kittx Kreationz
This kit is unavailable but any Halloween kit should work
Temp by Janice & Denny
Mask Of Choice
Filters:
VM Extravaganza- Transmission
Eye Candy: Textures- Texture Noise
Eye Candy: Impact- Gradient Glow
Xero- Fritillary
Drop Shadow:
Whatever you prefer
Template:
*Open and Duplicate Temp...Delete Credit Layer
*Raster 11...Select/Float/Defloat...Flood Fill with #d16809
Add some noise to this layer.
*Raster 9...MW...C&P paper 6 into selection
*Raster 16...Select/Float/Defloat...Flood Fill with #fbb560
*Raster 8...MW...C&P paper 6 into selection
*Copy of Raster 16...Select/Float/Defloat...Flood Fill with #fbb560
*Raster 7...Select/Float/Defloat...Flood Fill with #20a6f1
Apply Xero- Fritillary Settings 5/9/10/111
*Raster 6...Select/Float/Defloat...Flood Fill with Black
Apply Xero- Fritillary Settings 5/9/10/111
*Raster 5...Select/Float/Defloat...Flood Fill with #d16809
Apply VM Extravaganza- Transmission Settings 9/0/8
*Raster 4...MW...C&P paper 5 into selection
*Raster 3...Select/Float/Defloat...Flood Fill with #138ee7
Apply Eye Candy: Textures- Texture Noise...Settings Heavy Rain Preset
*Raster 17...Select/Float/Defloat...Flood Fill with Black
Add Some noise to this layer
*Raster 15...Select/Float/Defloat...Flood Fill with #fbb560
Apply VM Extravaganza- Transmission Settings 9/0/8
*Raster 2...MW...C&P paper 6 as a new Layer...RS 65% Invert/Delete
Merge Down
*Raster 1...Select/Float/Defloat...Flood Fill with #d16809
Add some noise to this layer.
*Raster 14...Select/Float/Defloat...Flood Fill with #20a6f1
Add some noise to this layer.
*Copy Of Raster 14...Add some noise to this layer.
*Raster 10...Select/Float/Defloat...Flood Fill with #fbb560
Add some noise to this layer.
**Add some Gradient Glow to the template layers.
C&P Elements:
**Add your preferred Tube where you think it looks best
*Element 27...move toward the Top of the Canvas...
Duplicate/Flip and Mirror...Merge Down...Place above Copy of Raster 16
RS 90%
*Element 53...Place behind your tube to the left on the canvas
*Element 48...Place behind Raster 3...Duplicate/ Flip and Merge Down
*Element 29...Flip/Mirror and place behind your tube
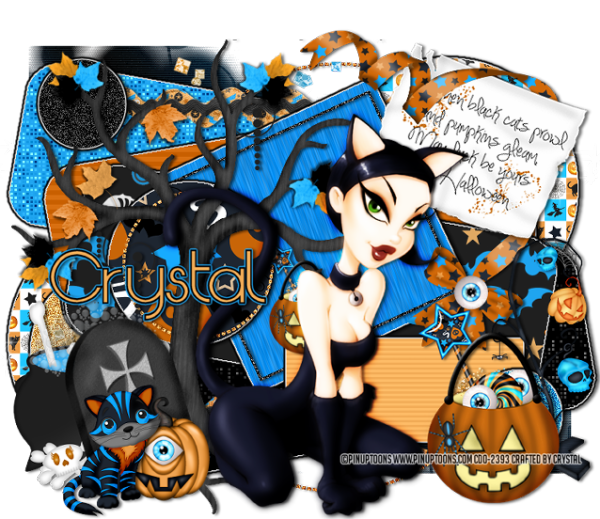
(See My Tag For Reference)
*Element 41...RS 75%...Place to the right of your tube
*Element 37...RS 75%...Place Above ribbon...Click on the Ribbon
Select/Float/Defloat...Activate letter Delete part of the letter
so the Ribbon looks like it is wrapping around.
(See My Tag For Reference)
*Element 57...RS 75% place behind the tree
*Element 2...RS 55%...place in front of the tree.
*Element 18...RS%...Mirror and place behind the treat bucket
Add your name, Copyright info and Watermark
Re-Size your tag if you want to and you are done
Supplies:
Tube by PinUp Toons
He has not been in a store since SDNC
Scrap Kit by Kittx Kreationz
This kit is unavailable but any Halloween kit should work
Temp by Janice & Denny
Mask Of Choice
Filters:
VM Extravaganza- Transmission
Eye Candy: Textures- Texture Noise
Eye Candy: Impact- Gradient Glow
Xero- Fritillary
Drop Shadow:
Whatever you prefer
Template:
*Open and Duplicate Temp...Delete Credit Layer
*Raster 11...Select/Float/Defloat...Flood Fill with #d16809
Add some noise to this layer.
*Raster 9...MW...C&P paper 6 into selection
*Raster 16...Select/Float/Defloat...Flood Fill with #fbb560
*Raster 8...MW...C&P paper 6 into selection
*Copy of Raster 16...Select/Float/Defloat...Flood Fill with #fbb560
*Raster 7...Select/Float/Defloat...Flood Fill with #20a6f1
Apply Xero- Fritillary Settings 5/9/10/111
*Raster 6...Select/Float/Defloat...Flood Fill with Black
Apply Xero- Fritillary Settings 5/9/10/111
*Raster 5...Select/Float/Defloat...Flood Fill with #d16809
Apply VM Extravaganza- Transmission Settings 9/0/8
*Raster 4...MW...C&P paper 5 into selection
*Raster 3...Select/Float/Defloat...Flood Fill with #138ee7
Apply Eye Candy: Textures- Texture Noise...Settings Heavy Rain Preset
*Raster 17...Select/Float/Defloat...Flood Fill with Black
Add Some noise to this layer
*Raster 15...Select/Float/Defloat...Flood Fill with #fbb560
Apply VM Extravaganza- Transmission Settings 9/0/8
*Raster 2...MW...C&P paper 6 as a new Layer...RS 65% Invert/Delete
Merge Down
*Raster 1...Select/Float/Defloat...Flood Fill with #d16809
Add some noise to this layer.
*Raster 14...Select/Float/Defloat...Flood Fill with #20a6f1
Add some noise to this layer.
*Copy Of Raster 14...Add some noise to this layer.
*Raster 10...Select/Float/Defloat...Flood Fill with #fbb560
Add some noise to this layer.
**Add some Gradient Glow to the template layers.
C&P Elements:
**Add your preferred Tube where you think it looks best
*Element 27...move toward the Top of the Canvas...
Duplicate/Flip and Mirror...Merge Down...Place above Copy of Raster 16
RS 90%
*Element 53...Place behind your tube to the left on the canvas
*Element 48...Place behind Raster 3...Duplicate/ Flip and Merge Down
*Element 29...Flip/Mirror and place behind your tube
(See My Tag For Reference)
*Element 41...RS 75%...Place to the right of your tube
*Element 37...RS 75%...Place Above ribbon...Click on the Ribbon
Select/Float/Defloat...Activate letter Delete part of the letter
so the Ribbon looks like it is wrapping around.
(See My Tag For Reference)
*Element 57...RS 75% place behind the tree
*Element 2...RS 55%...place in front of the tree.
*Element 18...RS%...Mirror and place behind the treat bucket
Add your name, Copyright info and Watermark
Re-Size your tag if you want to and you are done
No comments:
Post a Comment