

This Tutorial was written by Chasunicorn
On March 29, 2012.
*Updated November 2025*
Supplies:
Tube by Elias C
I have not seen him selling anywhere recently
Scrap Kit by Randy's Sin
This kit is unavailable but any Easter Kit with a basket should work
Filters:
DBS Flux~Bright Noise
Eye Candy~Grad Glow (for Word Art)
MuRa's Meister~Copies
Drop Shadow:
-2/0/55/3/Black
Canvas Size:
Banner~600x400 AV 150x150
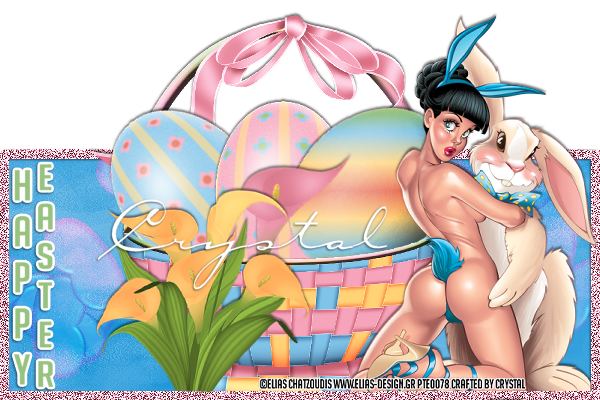
Ok, we are going to start on our Banner Tag:
*Selection Tool...Draw a rectangle near the bottom of your canvas
C&P into selection Paper 14...Selections/Modify/Selection Borders/Inside/8
*Add a new layer Flood Fill with coordinating color from your tube.
Deselect and add desired Bright Noise.
* Basket 2...RS 55%...MW on the Frame Layer...Adjust basket so it
looks as if it's popping out of the frame at the top...Duplicate...Hide Copy...
Make sure the Original is active....Invert/Delete/Slide under the Frame layer you made.
Deselect...Un-Hide the copy...add DS and erase the bottom portion of the basket.
*Egg 11...RS 35% and again 75%...Free Rotate 40% to the left...DS
*Egg 2...RS 35% and again 75%...Free Rotate 40% to the right...DS
*Egg 10...RS 35% and again 75%...Arrange how you see fit...DS
Merge Down till all the eggs are on one layer
Now carefully erase the bottom of the eggs so it
looks like the are sitting in the basket
*Calla 3...RS 3 Times 75%...Arrange to the the
left of the tag in front of the basket...DS
*Calla 2...RS 3 times 75%...slide under Calla 3...
Free Rotate 20% to the right DS
*Jellybean 1...RS 15%...Apply Copies...Walpaper rotate defualt settings...
activate Raster 1(Paper 14)...selections/float/defloat...Click on the jellybean layer (Raster 9)
Invert/Delete Deselect...This gives the paper a bit of depth
*Add your tube to the right of your tag...erase any part that sticks out of
the bottom of the frame
Add any Wording you want your tag to have
At this Point I start Working the AV...since this is not you normal size Forum set
*Hide all layers except the jellybean and paper layers
Copy Merged and paste onto a new canvas sized 150x150...RS layer by 85%
Arrange to where you want it
*Select all on Raster one and activate Raster 2
Image/Crop to selection
*Select All/float/defloat/Modify/Select Borders
Flood Fill with same color you used on you banner tag
Add Bright Noise
*Add your tube to you AV...Crop if needed...DS
Add your name, Copyright info and Watermark
Re-Size your tag if you want to and you are done
On March 29, 2012.
*Updated November 2025*
Supplies:
Tube by Elias C
I have not seen him selling anywhere recently
Scrap Kit by Randy's Sin
This kit is unavailable but any Easter Kit with a basket should work
Filters:
DBS Flux~Bright Noise
Eye Candy~Grad Glow (for Word Art)
MuRa's Meister~Copies
Drop Shadow:
-2/0/55/3/Black
Canvas Size:
Banner~600x400 AV 150x150
Ok, we are going to start on our Banner Tag:
*Selection Tool...Draw a rectangle near the bottom of your canvas
C&P into selection Paper 14...Selections/Modify/Selection Borders/Inside/8
*Add a new layer Flood Fill with coordinating color from your tube.
Deselect and add desired Bright Noise.
* Basket 2...RS 55%...MW on the Frame Layer...Adjust basket so it
looks as if it's popping out of the frame at the top...Duplicate...Hide Copy...
Make sure the Original is active....Invert/Delete/Slide under the Frame layer you made.
Deselect...Un-Hide the copy...add DS and erase the bottom portion of the basket.
*Egg 11...RS 35% and again 75%...Free Rotate 40% to the left...DS
*Egg 2...RS 35% and again 75%...Free Rotate 40% to the right...DS
*Egg 10...RS 35% and again 75%...Arrange how you see fit...DS
Merge Down till all the eggs are on one layer
Now carefully erase the bottom of the eggs so it
looks like the are sitting in the basket
*Calla 3...RS 3 Times 75%...Arrange to the the
left of the tag in front of the basket...DS
*Calla 2...RS 3 times 75%...slide under Calla 3...
Free Rotate 20% to the right DS
*Jellybean 1...RS 15%...Apply Copies...Walpaper rotate defualt settings...
activate Raster 1(Paper 14)...selections/float/defloat...Click on the jellybean layer (Raster 9)
Invert/Delete Deselect...This gives the paper a bit of depth
*Add your tube to the right of your tag...erase any part that sticks out of
the bottom of the frame
Add any Wording you want your tag to have
At this Point I start Working the AV...since this is not you normal size Forum set
*Hide all layers except the jellybean and paper layers
Copy Merged and paste onto a new canvas sized 150x150...RS layer by 85%
Arrange to where you want it
*Select all on Raster one and activate Raster 2
Image/Crop to selection
*Select All/float/defloat/Modify/Select Borders
Flood Fill with same color you used on you banner tag
Add Bright Noise
*Add your tube to you AV...Crop if needed...DS
Add your name, Copyright info and Watermark
Re-Size your tag if you want to and you are done
No comments:
Post a Comment