Welcome to Crazed Creations by Crystal Tutorials!
I have been hunting down all of my tutorials for a few years now,
and finally I was able to locate them just the other day.
Some things to know about these tutorials... 
Most of them are missing links to supplies, whether it is 
because an artist or designer has retired, tagger's blog has 
been deleted etc. In this case, please treat the tutorial
as inspiration. As I update each tutorial, I will slowly re-release them.
ALL Tutorials before 2024 are AI FREE, meaning no AI was used.
and all newer tutorials will be labelled accordingly.

Any and all Tutorials posted within this site
are of my own creation.
Any similarities to any other is purely coincidental.
 DO NOT CLAIM AS YOUR OWN!
You are allowed to use them as challenges within your forum 
by linking back to this site.
I hope you enjoy the tutorials that I have created.
Please feel free to leave comments and or suggestions!!!
Some tips...
I use abbreviations in my tutorials, 
the more common ones are below:
C&P~Copy and Paste
RS~Re-size
DS~Drop Shadow
MW~Magic Wand
Showing posts with label Artist: Elias Chatzoudis. Show all posts

Simple Day


Tutorial written by Chasunicorn

On February 29, 2012.

*Updated November 2025*

Supplies:

Tube~ Elias C

I have not seen him selling anywhere recently

Scrap Kit by Jaelop Designs

Any Kit with Similar Elements should work

Filters:

Xero~Radiance & Porcelain (Optional)

Drop Shadow:

Your choice

C&P Elements:

*6...RS 25%...Move to the top left...Duplicate/Mirror/Flip/Merge Down

*12...RS 25%...Move to the Top right...Duplicate/Mirror/Flip/Merge Down

*4...RS 25%...Move to the top left...Duplicate/Mirror/Flip...

move so the 2 frames overlap...Select/float/defloat the original frame

and delete left side of the copy so it looks like the frames are woven through

each other. Merge Layers

*Paper 1...MW the small rectangle section on the 2 frames...New Layer Paste into selection

Deselect

*Paper 2...MW the larger areas of the frames...expand by 8...New Layer...paste into selection

Deselect

*MW...all open areas of the frames...Expand by 8...Paste Close up of your tube

Invert/Delete...Blend mode Overlay...opacity 78%......Invert/Delete...Deselect

*19...RS 25%...Erase the last 4-5 stiches on the element...Arrange to your liking

*9...Mirror...RS 55% and again at 75%...Duplicate/Slide one under the frames and

papers...Delete top copy to make it look like the leaves are overlapping the frame

*18...RS 20%...Slide under the leaf top layer

*15...RS 20%...Place at the top left corner of the frame...Duplicate/Mirror/Flip...

Move to the bottom Right Corner of the frames....Merge down

Add your preferred Tube where you think it looks best

(I added Radiance and Porcelain  to my main Tube)

Add your name, Copyright info and Watermark

Re-Size your tag if you want to and you are done
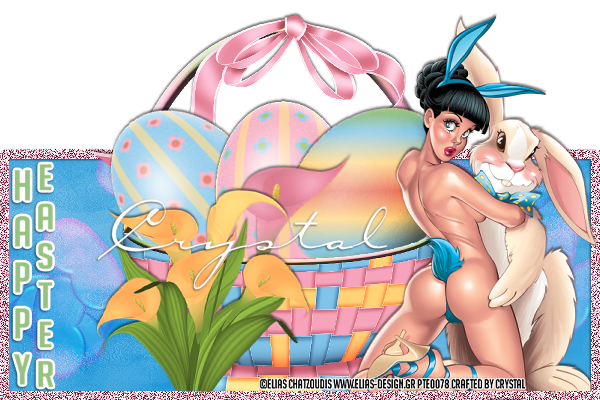
Easter Basket Forum Set


This Tutorial was written by Chasunicorn
On March 29, 2012.
*Updated November 2025*
Supplies:
Tube by Elias C
I have not seen him selling anywhere recently
Scrap Kit by Randy's Sin
This kit is unavailable but any Easter Kit with a basket should work
Filters:
DBS Flux~Bright Noise
Eye Candy~Grad Glow (for Word Art)
MuRa's Meister~Copies
Drop Shadow:
-2/0/55/3/Black
Canvas Size:
Banner~600x400 AV 150x150
Ok, we are going to start on our Banner Tag:
*Selection Tool...Draw a rectangle near the bottom of your canvas
C&P into selection Paper 14...Selections/Modify/Selection Borders/Inside/8
*Add a new layer Flood Fill with coordinating color from your tube.
Deselect and add desired Bright Noise.
* Basket 2...RS 55%...MW on the Frame Layer...Adjust basket so it
looks as if it's popping out of the frame at the top...Duplicate...Hide Copy...
Make sure the Original is active....Invert/Delete/Slide under the Frame layer you made.
Deselect...Un-Hide the copy...add DS and erase the bottom portion of the basket.
*Egg 11...RS 35% and again 75%...Free Rotate 40% to the left...DS
*Egg 2...RS 35% and again 75%...Free Rotate 40% to the right...DS
*Egg 10...RS 35% and again 75%...Arrange how you see fit...DS
Merge Down till all the eggs are on one layer
Now carefully erase the bottom of the eggs so it
looks like the are sitting in the basket
*Calla 3...RS 3 Times 75%...Arrange to the the
left of the tag in front of the basket...DS
*Calla 2...RS 3 times 75%...slide under Calla 3...
Free Rotate 20% to the right DS
*Jellybean 1...RS 15%...Apply Copies...Walpaper rotate defualt settings...
activate Raster 1(Paper 14)...selections/float/defloat...Click on the jellybean layer (Raster 9)
Invert/Delete Deselect...This gives the paper a bit of depth
*Add your tube to the right of your tag...erase any part that sticks out of
the bottom of the frame
Add any Wording you want your tag to have
At this Point I start Working the AV...since this is not you normal size Forum set
*Hide all layers except the jellybean and paper layers
Copy Merged and paste onto a new canvas sized 150x150...RS layer by 85%
Arrange to where you want it
*Select all on Raster one and activate Raster 2
Image/Crop to selection
*Select All/float/defloat/Modify/Select Borders
Flood Fill with same color you used on you banner tag
Add Bright Noise
*Add your tube to you AV...Crop if needed...DS
Add your name, Copyright info and Watermark
Re-Size your tag if you want to and you are done


Santa's Chick


This tutorial was written by Chasunicorn
On November 16, 2010.
*Updated November 2025*
Supplies Needed:
PSP 9 (any version will do)
 I am using the wonderful art by Elias Chatzoudis,

Have not seen him selling since CDO 
The Scrap kit I am using is called Sweet Christmas by Scrap and Tube

(No longer available but any Christmas kit would work)

No filters are used but if you want to use them feel free.

Drop Shadow:
1/1/100/5 Black
You can change this up to suit your taste.


Let's Get Started Shall we!
First off let's pull out the elements you will be using in this Tutorial
Your choice of tube
Elements:
Frame
Paper 5
Christmas Balls
Stocking
nm-star
Bear Gift Box
Gift Box
Candy Cane
Christmas Tree
Here We Go:

1. Open a new image

600x600
2. Copy & paste the frame as a new layer and Re-size 75%
Magic Wand~ Click inside your frame layer
Select/Modify/Expand/4
3. Copy & Paste the paper as a new layer
Select/Invert/Delete
Slide under the Frame Layer
With Selection still active...
4. Copy & Paste the Christmas Balls Element as a new layer
Re-size 75%
Move slightly up and hit Delete
With Selection still active...
5. Copy & Paste your tube as a new layer
(depending on your tube you may have to re-size, do so and continue with the tutorial)
Duplicate and then hide your copy
return to you Original tube layer and hit delete
Slide this layer under the frame layer
Select none (Ctrl-D)
Un-hide your copy of your original tube layer
Take the eraser and erase the bottom of that layer so that it now looks as thou she is popping out of the frame.
6. Copy & Paste the Christmas tree
Re-size 75% twice
Image/Mirror
Place in the lower right hand corner
7. Bear Gift Box and Gift Box are the same
Copy and Paste as a new layer
Re-size 60% twice
place in front of the Christmas tree 

Tagger Results:

(Rhonda 2010)