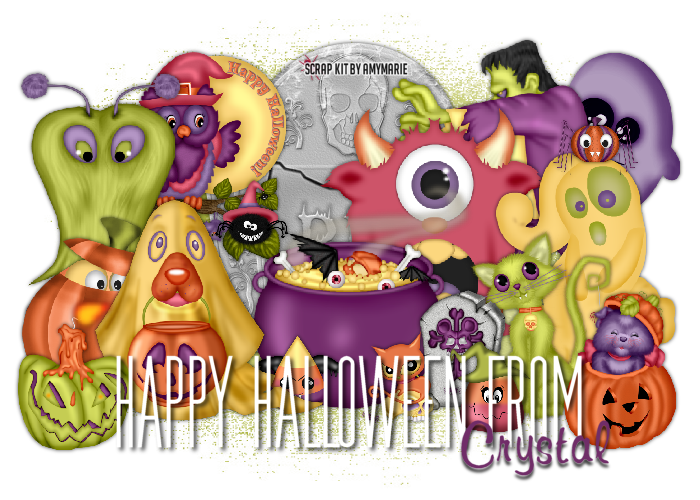
This Tutorial was written by Chasunicorn
on September 4, 2014.
*Updated November 2025*
Supplies:
Halloween Scrap Kit by AmyMarie Kits
(This kit is no longer available but any Halloween Kit should work)
Mask of Choice
Filters:
NONE
Drop Shadow:
Whatever you prefer
Canvas Size:
700x500
C&P Elements:
*Mask layer...MW and C&P into selection paper 24
Apply Mask of Choice and Merge Group
*Element 33...C&P as a new layer...RS by 75%
Place to the right of the canvas
*Element 2...C&P as a new layer...RS by 55%
Place on the left of the canvas
*Element 7...C&P as a new layer...RS by 55%...
Place behind the dog on the left of the canvas
*Element 27...C&P as a new layer...RS by 55%...
Place in front of the Frankenstein on the right of the canvas
*Element 21...C&P as a new layer...RS by 45%...
Place in front of the Frankenstein on the right of the canvas
*Element 38...C&P as a new layer...RS by 65%...
Place behind the dog on the left of the canvas
*Element 10...C&P as a new layer...RS by 65%...
Place to the center of the canvas
*Element 5...C&P as a new layer...RS by 45%...
Place behind Frankenstein on the right of the canvas
*Element 39...C&P as a new layer...RS by 65%...
Place to the center behind the cauldron slightly
*Element 20...C&P as a new layer...Place to the
back of all the elements
*Element 42...C&P as a new layer...RS by 45%...
Place in front of the cauldron
*Element 12...C&P as a new layer...RS by 45%...
Place in front of the dog on the left of the canvas
*Element 29...C&P as a new layer...RS by 65%...
Place to the right side of the canvas
*Element 16...C&P as a new layer...RS by 25%
Place where you think it will look best
*Element 8...C&P as a new layer...RS by 25%
Place where you think it will look best
*Element 4...C&P as a new layer...RS by 25%
Place where you think it will look best
*Element 40...C&P as a new layer...RS by 25%
Place where you think it will look best
Add your name, Copyright info and Watermark
Re-Size your tag if you want to and you are done
Mask of Choice
Filters:
NONE
Drop Shadow:
Whatever you prefer
Canvas Size:
700x500
C&P Elements:
*Mask layer...MW and C&P into selection paper 24
Apply Mask of Choice and Merge Group
*Element 33...C&P as a new layer...RS by 75%
Place to the right of the canvas
*Element 2...C&P as a new layer...RS by 55%
Place on the left of the canvas
*Element 7...C&P as a new layer...RS by 55%...
Place behind the dog on the left of the canvas
*Element 27...C&P as a new layer...RS by 55%...
Place in front of the Frankenstein on the right of the canvas
*Element 21...C&P as a new layer...RS by 45%...
Place in front of the Frankenstein on the right of the canvas
*Element 38...C&P as a new layer...RS by 65%...
Place behind the dog on the left of the canvas
*Element 10...C&P as a new layer...RS by 65%...
Place to the center of the canvas
*Element 5...C&P as a new layer...RS by 45%...
Place behind Frankenstein on the right of the canvas
*Element 39...C&P as a new layer...RS by 65%...
Place to the center behind the cauldron slightly
*Element 20...C&P as a new layer...Place to the
back of all the elements
*Element 42...C&P as a new layer...RS by 45%...
Place in front of the cauldron
*Element 12...C&P as a new layer...RS by 45%...
Place in front of the dog on the left of the canvas
*Element 29...C&P as a new layer...RS by 65%...
Place to the right side of the canvas
*Element 16...C&P as a new layer...RS by 25%
Place where you think it will look best
*Element 8...C&P as a new layer...RS by 25%
Place where you think it will look best
*Element 4...C&P as a new layer...RS by 25%
Place where you think it will look best
*Element 40...C&P as a new layer...RS by 25%
Place where you think it will look best
Add your name, Copyright info and Watermark
Re-Size your tag if you want to and you are done